January 4, 2026

New Post for January 4, 2026

a warm and happy new year to all!

Happy New Year 2026!

Post Date: January 4, 2026

Permalink

Ready

October 19, 2025

why is nothing easy

but progress never is!

Digital Diary 2000 Pro - github page for this is coming soon, few kinds need to be worked out.

Mesh View - 3D mesh/texture viewer for the web. another one at least.

QuickScan - In-browser QR scanner that doesn't suck.

Check 'em out!

Post Date: October 19, 2025

Permalink

Ready

October 6, 2025

A New (old) look!

Windows 95 startup screen featuring the 95 logo on clouds

now featuring the 98.css library

The blog was wrapped in jdan's 98.css like the rest of the website, including the editor. Permalinks now have their own pages, and there is a nifty toolbar. Updates to GitHub coming soonish.

Post Date: October 6, 2025

Permalink

Ready

July 11, 2025

Chevy C/10

Downtown Brooklyn

Post Date: July 11, 2025

Permalink

Ready

July 5, 2025

Freedom Bulbs

Freedom Bulbs

Brooklyn, NY

Post Date: July 5, 2025

Permalink

Ready

May 7, 2025

Basic Handwritten Number Recognition Network

Training a Convolutional Neural Network (CNN) on handwritten digits is a classic beginner project using the MNIST dataset. Here's a clear, minimal walkthrough using Python, PyTorch, and your CUDA-enabled GPU.

Download the files here but still read through the instructions:

0. Create a New Virtual Environment

bash

cd /home/user/directory/etc
python -m venv venv
source venv/bin/activate

1. Install Dependencies

Ensure Python is installed (>=3.8). Then, install PyTorch with CUDA support:

bash

pip install torch torchvision matplotlib

This little maneuver is going to cost you 5GiB++

Check if GPU is detected in Python:

python

import torch
print(torch.cuda.is_available())  

This should print 'True'

2. Load the MNIST Dataset

This is a publicly available dataset and will be loaded when needed, it does not have to be download separately in preparation.

python

import torch
import torch.nn as nn
import torch.optim as optim
from torchvision import datasets, transforms
from torch.utils.data import DataLoader

transform = transforms.Compose([transforms.ToTensor()])

train_set = datasets.MNIST(root='./data', train=True, download=True, transform=transform)
test_set = datasets.MNIST(root='./data', train=False, download=True, transform=transform)

train_loader = DataLoader(train_set, batch_size=64, shuffle=True)
test_loader = DataLoader(test_set, batch_size=1000, shuffle=False)

3. Define a Simple CNN

python

class CNN(nn.Module):
    def __init__(self):
        super().__init__()
        self.net = nn.Sequential(
            nn.Conv2d(1, 16, 3, 1),
            nn.ReLU(),
            nn.MaxPool2d(2),
            nn.Conv2d(16, 32, 3, 1),
            nn.ReLU(),
            nn.MaxPool2d(2),
            nn.Flatten(),
            nn.Linear(5*5*32, 128),
            nn.ReLU(),
            nn.Linear(128, 10)
        )

def forward(self, x):
    return self.net(x)

device = torch.device("cuda" if torch.cuda.is_available() else "cpu")
model = CNN().to(device)

4. Train the Model

python

criterion = nn.CrossEntropyLoss()
optimizer = optim.Adam(model.parameters(), lr=0.001)

for epoch in range(5):  # 5 epochs is enough for MNIST
    model.train()
    for images, labels in train_loader:
        images, labels = images.to(device), labels.to(device)
        optimizer.zero_grad()
        output = model(images)
        loss = criterion(output, labels)
        loss.backward()
        optimizer.step()
    print(f"Epoch {epoch+1} complete")

5. Evaluate Accuracy

python

correct = 0
total = 0
model.eval()
with torch.no_grad():
    for images, labels in test_loader:
        images, labels = images.to(device), labels.to(device)
        outputs = model(images)
        _, predicted = torch.max(outputs.data, 1)
        total += labels.size(0)
        correct += (predicted == labels).sum().item()

print(f"Test Accuracy: {100 * correct / total:.2f}%")

6. Running the Entire Thing

If you are cutting and pasting, you may be getting some indentation and other errors. In this case, download the complete file here and run using the commands below.

  • create some images of handwritten numbers
  • move them into the mnist directory
  • the script is looking for an image named number.png

bash

cd /home/user/directory/etc
python mnist_train_and_test.py

You should start seeing the process run through 500 epochs, and output a test accuracy. (This number can be adjusted on line 49)

7. Proving the Principle Again

At the end of the above test, you should see a prediction of the number in the picture along with an accuracy certainty. The script also saved the model as mnist_test_net.pth so it can be reused for number prediction for other pictures. Try your other examples from the previous step.

Supplied is a script that will load up a selected model and selected image and return a result.

Post Date: May 7, 2025

Permalink

Ready

May 3, 2025

meetings at microsoft

How meetings go at microsoft.

never a dull day at Redmond

Post Date: May 3, 2025

Permalink

Ready

April 12, 2025

snakeShaker 🐍

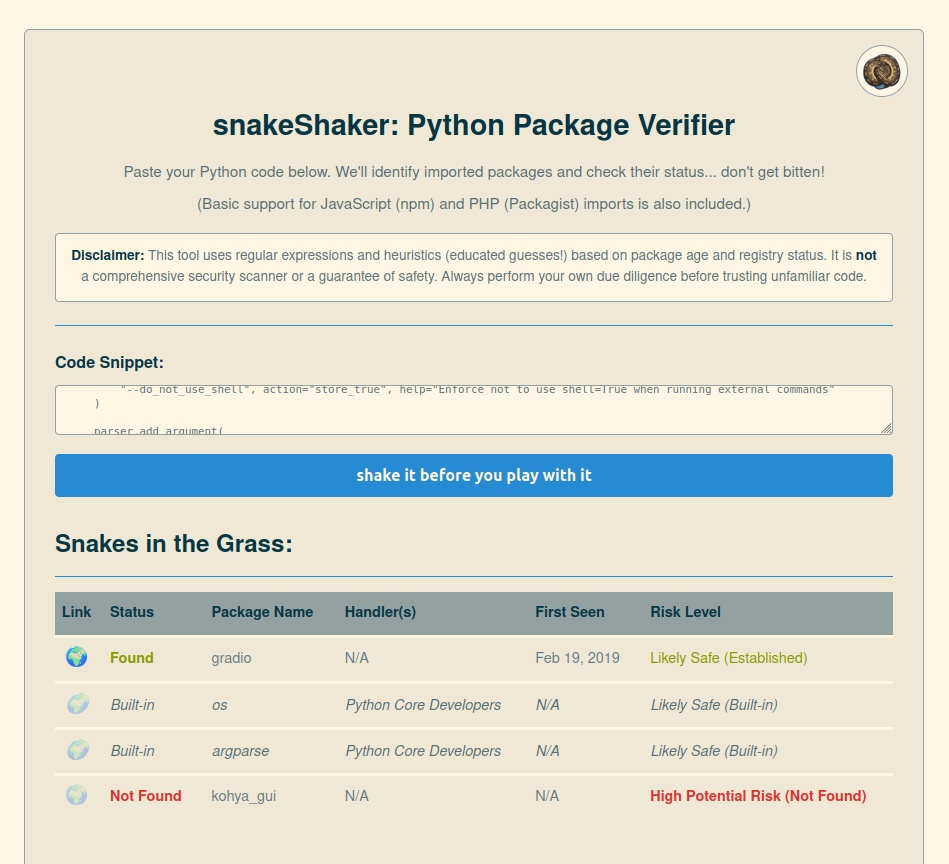
Don't get bitten by risky Python packages!

snakeShaker is a simple web utility designed to give you a quick first glance at the potential risks associated with package imports in your Python code snippets. Paste your code, give it a shake, and see what slithers out! It primarily focuses on Python (PyPI) but has basic awareness of JavaScript (npm) and PHP (Packagist) imports too.

Live Demo Available

snakeShaker screenshot

What's This Hiss About? (Features)

  • Identifies Imports: Uses regular expressions to find import and from ... import statements in Python code, plus basic require/import in JS and use statements in PHP.
  • Registry Checks: Queries public package registries (PyPI, npm Registry, Packagist) and the wise old Libraries.io API to verify package existence.
  • Basic Metadata: Fetches information like the package author/maintainers ("handlers") and the date the package first slithered online ("First Seen").
  • Heuristic Safety Assessment: Provides a very basic, heuristic (read: educated guess!) safety likelihood based primarily on the package's age and registry status. Think of it as trying to tell a harmless garter snake from a potential viper based on first impressions – not a definitive identification!
  • Built-in Awareness: Recognizes common Python and Node.js built-in modules (no need to fear the os or fs modules!).
  • Simple Interface: Just paste, click, and view the results in a clear table.

How to Use

  1. Navigate to the lair: [https://snake.timnetworks.net](https://snake.timnetworks.net)
  2. Paste your Python (or JS/PHP) code snippet into the text area.
  3. Hit the "shake it before you play with it" button.
  4. Watch it hiss (analyze) for a moment.
  5. Examine the "Snakes in the Grass" results table for insights on your imports.

Tech Stack / Ingredients

  • Frontend: Vanilla JavaScript (ES6+) for DOM manipulation and API interaction.
  • Backend: PHP for processing the code, orchestrating API calls, and basic safety heuristics.
  • Styling: CSS with a Solarized Light-inspired theme.

APIs Used

  • PyPI JSON API
  • npm Registry API
  • Packagist API
  • Libraries.io API (Requires API Key - see api.php)

Important Hisses (Limitations & Disclaimer)

🐍 Anti-Venom Not Included! Please Read Carefully! 🐍

  • NOT a Security Scanner: This tool is NOT a comprehensive security analysis tool. It uses relatively simple pattern matching (regex) and basic checks (like package age). It's intended as a preliminary check or a curiosity tool, not a guarantee of security or correctness.
  • False Positives/Negatives: Complex code structures, aliased imports (import pandas as pd), dynamic imports/requires, or unconventional formatting might confuse the parser, leading to missed packages or incorrect identification.
  • Safety is Heuristic: The "Safety Likelihood" is purely based on easily obtainable data like creation date and existence on the registry. Age does NOT equal safety. Malicious packages can exist for years, and brand new packages can be perfectly safe. This assessment is just one data point and should be taken with a large grain of salt.
  • API Reliance: The accuracy and completeness of the results depend entirely on the availability and data provided by the external PyPI, npm, Packagist, and Libraries.io APIs. Downtime or rate limiting on their end will affect results.
  • Use Your Brain: Always perform your own due diligence. Review the source code of dependencies, check for known vulnerabilities (using dedicated tools like pip-audit, npm audit, etc.), understand the package's reputation, and consider the context before trusting any third-party code.

Post Date: April 12, 2025

Permalink

Ready

April 7, 2025

whatJacket 🧥 v0.8.2

A simple PHP web application that suggests clothing based on the weather forecast for a given US ZIP code and a selected activity category.

Live Demo Available here

Screenshot of WhatJacket app

Features

  • Fetches hourly forecast data for the immediate future from the NOAA/NWS API.
  • Geocodes US ZIP codes to latitude/longitude using the Nominatim (OpenStreetMap) API.

Clothing Suggestion Logic

  • Temperature Bands: Defined ranges (e.g., Hot, Mild, Cold, Frigid) based on current temperature.
  • "Feels Like" Temperature: Displayed for user context.
  • Weather Conditions: Identified using keywords (rain, snow, sunny, windy, severe, etc.) from the forecast text.
  • Wind Speed: Used for flags and specific item logic (e.g., umbrella usability).
  • Precipitation Probability: Used for selecting appropriate rain/snow gear.
  • Selected Activity Category: Filters items suitable for Casual, Hiking, Professional, etc.
  • Item Properties: Considers 
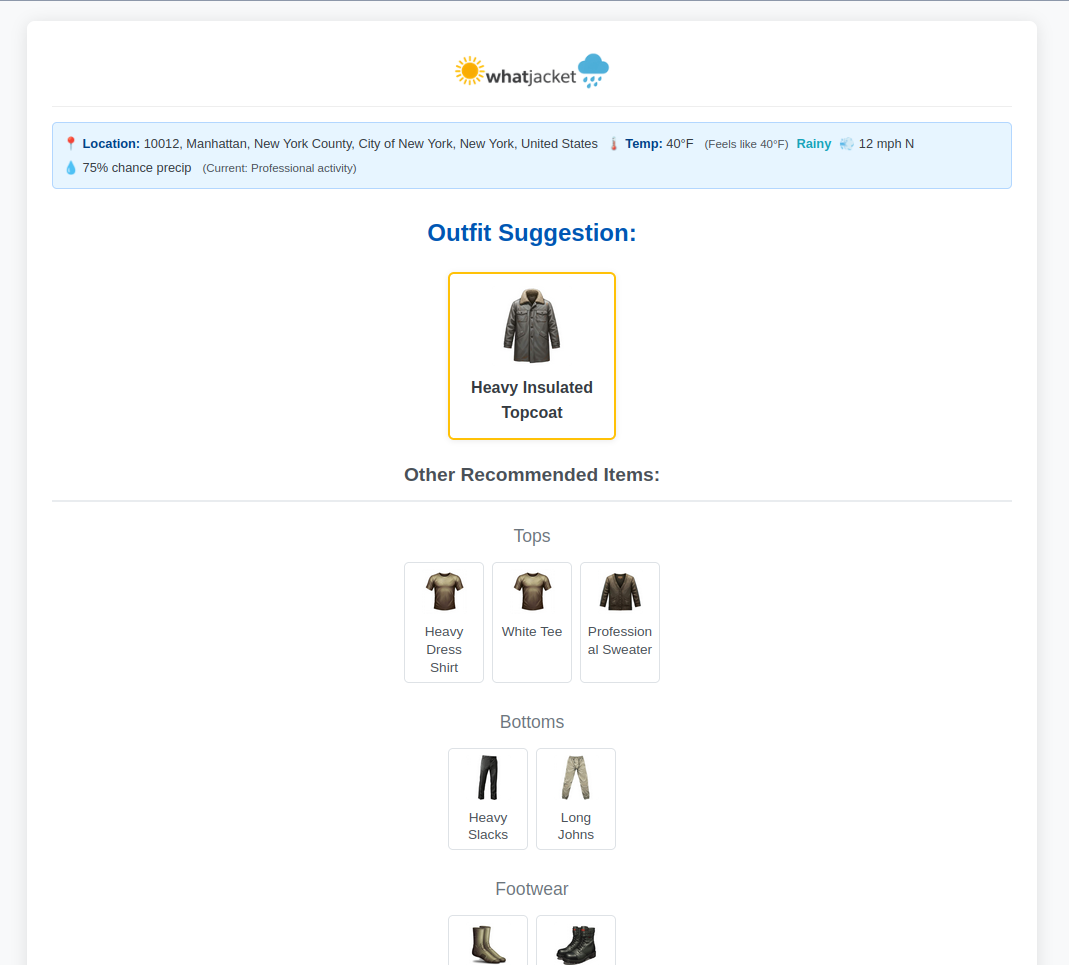
thermal_value, water_resistance, wind_resistance, sun_protection, special_conditions defined for each clothing item.
  • Layered Outfit Suggestions: Selects a base layer, bottoms, footwear, and appropriate mid/outer layers and accessories based on conditions.
  • Prioritization Logic: Favors condition-specific gear (raincoats in rain, windbreakers in wind) and thermally appropriate items. Includes specific logic (e.g., mandatory undershirt for Professional dress shirts).

User Interface

  • Displays results with item images, current conditions summary, and forecast details.
  • Features a dynamic background image based on the primary weather condition.
  • Includes a Fahrenheit/Celsius toggle.
  • Vertically stacked form elements for improved usability across devices.
  • Automatically hides the main input form when results are displayed.
  • Provides a "Change Activity" form on the results page for quick updates.
  • Persistence: Remembers the last used ZIP code, activity category, and temperature unit using PHP sessions.
  • Debug Tools: Includes separate pages (clothing-debug.php, outfit-simulator.php) for inspecting clothing items and simulating outfit generation under various conditions.

Tech Stack / Ingredients

  • Backend: PHP (7.4+ recommended)
  • Frontend: HTML and CSS
  • NOAA/NWS Weather API (api.weather.gov) for forecast data.
  • Nominatim Geocoding API (nominatim.openstreetmap.org) for ZIP code lookup.

Data Sources & Terms

  • Weather Data: Provided by the [NOAA/NWS API](https://www.weather.gov/documentation/services-web-api). Requires adherence to their Terms of Service, including the use of a valid User-Agent identifying your application and contact information (see config.php). Failure to provide a valid User-Agent may result in your access being blocked.
  • Geocoding Data: Provided by [Nominatim](https://nominatim.org/) using [OpenStreetMap](https://www.openstreetmap.org/copyright) data. Requires attribution as per the [Nominatim Usage Policy](https://operations.osmfoundation.org/policies/nominatim/). This attribution is automatically included in the site footer.

This application attempts full compliance with the terms of service for both APIs.

Setup

  • Clone or download this repository to your web server.
git clone https://github.com/timnetworks/whatJacket.git
  1. Ensure your web server (e.g., Apache, Nginx) is configured to run PHP. The script uses file_get_contents with stream contexts for API calls, which typically requires allow_url_fopen = On in your php.ini. If this is disabled for security reasons, you might need to refactor API calls to use the php-curl extension.
  2. Place the project files (index.php, functions.php, config.php, style.css, script.js, *.php debug pages, img/ directory, etc.) in your web server's document root or a suitable subdirectory.
  3. IMPORTANT: Open config.php and update the API_USER_AGENT constant with your actual application name/version and contact information (email or website) as required by the NOAA API terms.
// Example - REPLACE WITH YOUR DETAILS:
define('API_USER_AGENT', 'MyWhatJacketFork/1.0 (myemail@example.com; https://mywebsite.com/whatjacket)');
  1. Make sure the img/ directory structure exists (img/backgrounds/, img/icons/) and contains the image files referenced in config.php. Check file permissions if images are not loading. Create a default placeholder image at img/placeholder.png.
  2. Access the index.php file via your web browser.

Configuration (`config.php`)

Most application settings are controlled within config.php:

  • API_USER_AGENT: Must be set correctly for NOAA API compliance.
  • NOAA_API_BASE_URL, GEOCODING_API_BASE_URL: API endpoints.
  • APP_VERSION, APP_TITLE, APP_NAME_SHORT, APP_URL: Basic application info.
  • LOGO_IMAGE_PATH, OG_IMAGE_PATH: Paths to branding images.
  • DEFAULT_TEMP_UNIT, DEFAULT_CATEGORY: User defaults.
  • THEME_COLOR, BACKGROUND_COLOR: PWA theme settings.
  • CATEGORIES: Defines available activity categories, their labels, and icons (text/emoji and image path).
  • TEMP_BANDS: Defines temperature ranges (in C and F) and assigns a base target_thermal_score (used implicitly by selection logic).
  • CONDITION_KEYWORDS: Keywords used to identify weather conditions from forecast text.
  • CONDITION_THRESHOLDS: Values like WINDY_THRESHOLD_MPH, RAIN_PROBABILITY_THRESHOLD, UMBRELLA_MAX_WIND_MPH.
  • FOOTER_LINKS: Links displayed in the footer.
  • FORECAST_BACKGROUNDS: Mapping of primary condition keys to background images.
  • SIMPLE_CONDITION_DISPLAY: User-friendly names for primary weather conditions.
  • TYPE_TO_DISPLAY_GROUP_MAP: Maps clothing item types to display sections (Tops, Bottoms, etc.).
  • CLOTHING_ITEMS: The core database of clothing items.

Each item defines:

  • name, type, layer, category.
  • temp_bands: Array of temperature bands where the item is suitable.
  • thermal_value: Approximate warmth score (0=none, 4=very heavy). Used for sorting/prioritization.
  • water_resistance, wind_resistance, insulation, breathability, sun_protection.
  • special_conditions: Array of condition keys (e.g., 'rainy', 'windy') required or preferred for this item.
  • img, img_fallback: Paths to image assets. Ensure these paths are correct relative to index.php.

Debug Pages

  • clothing-debug.php: Displays a grid of all items defined in CLOTHING_ITEMS, showing their properties and checking the status (OK, Warning, Error) of their primary and fallback image files.
  • outfit-simulator.php: Allows you to manually select a temperature band, activity category, and specific weather conditions (windy, rainy, sunny, etc.) to test the output of the select_clothing() function and see the generated outfit. Includes the simulated forecast data used for the test.

Contributing

Pull requests are welcome. For major changes, please open an issue first to discuss what you would like to change.

License

This project is published under the [MIT License](https://opensource.org/licenses/MIT).

Acknowledgements

  • Thanks to the NOAA/NWS and OpenStreetMap/Nominatim projects for providing the essential data APIs.
  • Base code generation and refinement assisted by Google Gemini.

Post Date: April 7, 2025

Permalink

Ready

April 1, 2025

simpleSubwayStatus

Simple MTA status alerts for your line of choice, with filtering and display options.

MTA Status Page Screenshot

See the project on Github!

Simple Features

  • Pulls real-time alerts from MTA Subway Alerts feed.
  • Filter by Line Group: Easily filter alerts by standard MTA line groupings (e.g., 1/2/3, A/C/E, B/D/F/M, etc.) including Shuttles and SIR.
  • Toggle Future Alerts: Choose to show or hide alerts scheduled for a future date/time.
  • Clear "No Alerts" Indication: Displays a message and graphic when no alerts match your current filter settings.
  • Expandable Details: Click any alert summary to view the full description.
  • Relative Timestamps: See how long ago an alert was issued or when a future alert is scheduled to start.
  • Mobile and Desktop Viewports: Responsive design for various screen sizes.
  • Fixed Controls: Refresh, Show All, and Future Alert toggle are always accessible at the bottom.
  • Solarized whether you like it or not.

Simple Prerequisites

  • Web server with PHP support (PHP 7.0 or higher recommended, cURL extension recommended for better reliability).
  • A modern web browser.

Installation

  1. Clone this repository or download the files to your web server's document root (or a subdirectory).
  2. Ensure the web server has read permissions for all files (index.html, style.css, mtalogo.png, no_alerts.png) and execute permissions for status.php.
  3. Add Image: Place an image named no_alerts.png in the same directory. This will be displayed when no alerts are found.
  4. (Optional) MTA API Key: If you have an MTA API key, edit status.php and add it to the cURL or file_get_contents request headers for potentially better rate limits or access.
  5. Access the index.html page through your web browser via the web server.

File Structure

.
├── index.html
├── style.css
├── status.php
├── mtalogo.png
├── no_alerts.png
└── README.md

Usage

Viewing Alerts

  • All current and future alerts are shown by default on page load.
  • Use the filter buttons at the top to show alerts only for specific line groups (e.g., clicking the 'ACE' button shows alerts affecting A, C, or E lines). Shuttles and SIR are filtered individually.
  • Click on an alert summary (the card itself) to expand and view the detailed description. Click again to collapse.
  • Alerts show when they were issued or when they are scheduled to start.

Controls (Bottom Bar)

  • Refresh: Click the circular arrow button to fetch the latest alerts immediately.
  • Show All: Click this button to clear any active line filters and display all alerts (respecting the Future Alerts toggle).
  • Show Future Toggle: Use the switch to include or exclude alerts that are scheduled to begin at a future time.

Technical Details

PHP Proxy (`status.php`)

  • Acts as a simple backend to fetch data from the official MTA alert feed (https://api-endpoint.mta.info/Dataservice/mtagtfsfeeds/camsys%2Fsubway-alerts.json).
  • This avoids potential CORS (Cross-Origin Resource Sharing) issues that would occur if the browser tried to fetch directly from mta.info.
  • Includes basic error handling and timeout settings. Recommends using the cURL extension if available.
  • Sets Cache-Control headers to discourage aggressive caching of the status data.

Data Structure & Filtering

  • The application parses the JSON response from the MTA feed. JavaScript handles filtering based on:
  • Selected line groups stored in activeFilters.
  • The state of the "Show Future Alerts" toggle (activeFilters.showFuture).
  • The active_period[0].start timestamp of each alert.
  • The "No Alerts" message is shown dynamically when the filtering results in zero visible alert cards.

Line Grouping and Colors

  • Lines are grouped and ordered based on common MTA conventions:
  • 1, 2, 3 (Red)
  • 4, 5, 6 (Green)
  • 7 (Purple)
  • A, C, E (Blue)
  • G (Lime Green)
  • B, D, F, M (Orange)
  • N, Q, R, W (Yellow)
  • J, Z (Brown)
  • L (Gray)
  • S (42nd St Shuttle - Gray)
  • H / sR (Rockaway Shuttle - Gray)
  • FS / sF (Franklin Ave Shuttle - Gray)
  • SI (Staten Island Railroad - Blue)
  • Colors used are based on official MTA branding. Filtering applies to all lines within a clicked group (except for individual shuttles/SIR).

See the project on Github!

Post Date: April 1, 2025

Permalink

Ready